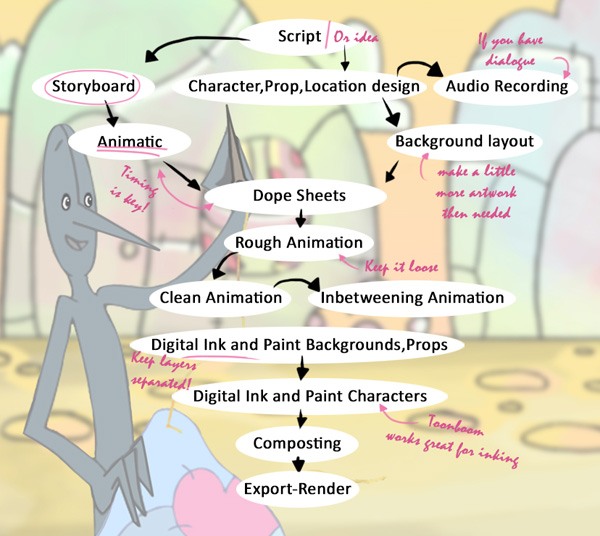
Alright, so you’ve always been fascinated by the art of animation, and you’re feeling inspired to bring your own characters to life. You’ve got a story in mind, and now you just need to know how to make it a reality. Well, we’ve got you covered. In this step-by-step guide, we’re going to walk you through the process of creating your very own animation. From brainstorming ideas and designing characters to animating and adding sound effects, we’ll provide you with all the tools and tips you need to turn your imagination into an animated masterpiece. So grab your sketchbook and let’s get started on this exciting animation adventure!
Step 1: Planning Your Animation
Defining your animation concept
When planning your animation, it’s important to have a clear idea of what you want to create. Determine the concept of your animation by answering questions like: What story do you want to tell? What message do you want to convey? Is it a comedy, drama, or adventure? Defining your concept will help you stay focused and guide your decision-making throughout the animation process.
Determining your target audience
Understanding your target audience is crucial when creating an animation. Consider who you want to engage with your animation. Are you targeting children, teenagers, or adults? This will influence your storytelling, visual style, and the overall tone of your animation. Identifying your target audience will help you create content that resonates with them.
Creating a storyboard
A storyboard is a visual representation of your animation, similar to a comic strip. It serves as a blueprint for your animation, providing a sequence of scenes and shots. Create rough sketches of each scene and include details like camera angles, character positions, and dialogue. Storyboarding allows you to see the flow of your animation and make adjustments before starting the detailed work.
Setting the animation length
Decide on the desired length of your animation. Consider the complexity of your story and the attention span of your target audience. Shorter animations may be more suitable for younger viewers, while longer animations can provide a deeper narrative. Setting the animation length will help you structure your storytelling and manage the overall production timeline.
Step 2: Gathering Resources and Tools
Choosing the right animation software
Selecting the right animation software is crucial for bringing your ideas to life. Consider factors such as your skill level, budget, and the features you require. Popular animation software options include Adobe Animate, Toon Boom Harmony, and Blender. Research and try out different software to find the one that best suits your needs and abilities.
Collecting reference materials
Gather reference materials to inspire and guide your animation. Look for images, videos, and artwork that align with your desired visual style. Reference materials can help you understand how to effectively convey emotion, movement, and depth in your animation. Collecting references will give you a visual library to draw from during the creation process.
Identifying desired visual style
Decide on the visual style you want for your animation. Do you prefer a cartoonish, realistic, or abstract aesthetic? Consider the mood and tone you want to convey and how the visual style can enhance the storytelling. Experiment with different art styles and reference materials to find the one that best suits your concept and engages your target audience.
Creating a time schedule
Developing a time schedule is essential for keeping your animation project on track. Break down the production process into smaller tasks and allocate specific time frames for each step. Consider factors such as storyboarding, character design, animation, and post-production. Creating a time schedule will help you manage your time effectively and ensure a timely completion of your animation.

Step 3: Creating the Characters
Designing the main characters
The main characters of your animation play a crucial role in engaging your audience. Spend time designing unique and interesting characters that embody the essence of your story. Consider their appearance, personality traits, and how they will interact with the other characters and the world around them. Designing compelling main characters will captivate your audience and bring your story to life.
Developing secondary characters
Secondary characters add depth and complexity to your animation. Think about the supporting roles and how they contribute to the narrative. Develop secondary characters with distinct personalities, appearances, and roles in the story. Giving attention to these characters will make your animation more dynamic and engaging for the audience.
Sketching character poses and expressions
Sketch various poses and expressions for your characters to bring them to life. Experiment with different body positions and facial expressions to convey emotion and movement. Consider the personalities of your characters and how their poses and expressions can reflect their moods and actions. Sketching character poses and expressions will serve as a guide for the animation process.
Creating character sheets
Character sheets are detailed reference guides for each character in your animation. Include front, side, and back views of the characters along with close-up shots of their facial features. Add information about clothing, colors, and any unique characteristics. Character sheets help maintain consistency in the appearance of your characters throughout the animation.
Step 4: Developing the Story
Writing the script
Craft a compelling script that forms the foundation of your animation. Consider the storyline, dialogue, and narrative structure. Write engaging dialogue that reflects the personality of your characters and pushes the story forward. Pay attention to pacing and ensure that each scene serves a purpose in the overall narrative.
Defining key plot points and scenes
Identify the key plot points and scenes that drive your story. These are the pivotal moments that keep the audience engaged and excited. Define the major turning points in your animation and how they connect to each other. Mapping out key plot points and scenes will help you structure your storytelling effectively.
Creating dialogue and narration
Dialogue and narration breathe life into your characters and their interactions. Write natural and engaging dialogue that reveals the characters’ personalities and advances the plot. Consider adding narration if it complements the storytelling and helps convey information to the audience. Craft dialogue and narration that effectively communicates the emotions, motives, and actions of your characters.
Ensuring a cohesive storyline
A cohesive storyline ensures that your animation flows smoothly from beginning to end. Ensure that each scene and plot point contributes to the overall narrative and creates a sense of unity. Review your script and storyboards to check for any inconsistencies or gaps in the storyline. Maintaining a cohesive storyline will help keep your audience engaged and immersed in your animation.

Step 5: Designing the Backgrounds and Props
Creating the main backgrounds
The main backgrounds set the stage for your animation and establish the environment in which the story unfolds. Design and create detailed backgrounds that complement the visual style and enhance the storytelling. Consider factors like lighting, colors, and perspective to create depth and atmosphere. Creating captivating main backgrounds will transport your audience into the world of your animation.
Designing supplemental backgrounds
Supplemental backgrounds add depth and richness to your animation. These can include interiors, exteriors, and additional settings that contribute to the storytelling. Pay attention to the details and textures of supplemental backgrounds to create a cohesive visual experience. Designing well-crafted supplemental backgrounds will make your animation visually engaging and immersive.
Sketching and finalizing props
Props are objects that the characters interact with in your animation. Sketch and finalize the design of props that are integral to the story or enhance the character’s actions. Consider the purpose and function of each prop and ensure they align with the overall visual style. Adding well-designed props will add realism and interest to your animation.
Adding details and textures
Adding details and textures to your backgrounds and props can elevate the visual quality of your animation. Pay attention to small details that enhance the realism or contribute to the overall mood. Experiment with textures and patterns to add depth and visual interest. Adding details and textures will make your animation visually captivating and visually compelling.
Step 6: Drawing the Frames
Blocking out the key frames
Blocking out the key frames is the initial step in animating your scenes. Sketch the main poses and actions of each character in the key frames to establish the motion and timing. Focus on clarity and readability, ensuring that the main actions are clearly conveyed. Blocking out the key frames provides a foundation for building the animation.
Adding breakdown poses and timing
Incorporate breakdown poses between the key frames to create smooth and fluid animation. These poses bridge the gap between the main actions and help convey the nuances of movement. Pay attention to timing and spacing to ensure the animation flows naturally. Adding breakdown poses and timing details brings your animation to life.
Refining the animation with in-between frames
In-between frames fill the gaps between the key frames and breakdown poses, resulting in a smoother motion. Add additional drawings to create a seamless transition between the main actions. Focus on maintaining consistent movement and fluidity. Refining the animation with in-between frames will make your animation look more polished and professional.
Adjusting timing and spacing
Timing and spacing are essential to creating realistic and dynamic animation. Experiment with different timing and spacing options to achieve the desired effect. Consider the weight and speed of objects and characters to make the animation feel natural. Fine-tune the timing and spacing to ensure that the animation flows smoothly and captures the intended motion.

Step 7: Adding Color and Effects
Choosing a color palette
Select a color palette that complements the visual style and enhances the mood of your animation. Consider the emotions you want to evoke and the personalities of your characters. Experiment with different color combinations to find the right balance. Choosing a well-suited color palette will elevate the visual appeal of your animation.
Applying color to characters and backgrounds
Bring your characters and backgrounds to life by adding color. Use the selected color palette to fill in the details and solidify the visual style. Pay attention to lighting and shadows to create depth and dimension. Applying color to characters and backgrounds will enhance the visual appeal of your animation and make it more engaging.
Adding shading and highlights
Shading and highlights add depth and realism to your animation. Observe the light source in each scene and apply shading accordingly to create the illusion of three-dimensional space. Add highlights to draw attention to specific areas and create contrast. Applying shading and highlights will make your animation look more polished and visually compelling.
Incorporating special effects
Special effects can enhance the visual impact and storytelling of your animation. Consider whether you want to include effects like explosions, fire, or magical elements. Experiment with different techniques and tools available in your chosen animation software. Incorporating special effects will add excitement and enhance the overall viewing experience.
Step 8: Animation Techniques and Tools
Understanding the principles of animation
Familiarize yourself with the fundamental principles of animation, such as squash and stretch, anticipation, and timing. These principles govern how objects and characters move and interact in your animation. Study examples and tutorials to understand how to effectively apply these principles. Understanding the principles of animation will help you create more convincing and dynamic motion.
Exploring different animation techniques
Animation offers a wide range of techniques to bring your ideas to life. Explore different styles such as 2D hand-drawn animation, 3D computer-generated animation, stop motion, or claymation. Research and experiment with various techniques to find the one that best suits your concept and skills. Exploring different animation techniques will add diversity and creativity to your animation.
Using keyframe animation
Keyframe animation involves defining key poses or frames at specific points in time and letting the software automatically interpolate the in-between frames. This technique allows for precise control over the motion and timing of your animation. Utilize the keyframe animation tools in your chosen software to animate your characters and objects efficiently.
Utilizing rigging and puppet tools
Rigging and puppet tools are useful for creating complex character animations. These tools allow you to set up a skeleton-like structure for your characters, enabling you to easily manipulate and animate them. Explore the rigging and puppet tools available in your animation software to streamline your character animation process.

Step 9: Sound Design and Voiceover
Selecting appropriate background music
Background music sets the mood and enhances the overall experience of your animation. Consider the emotions and atmosphere you want to convey and choose music that aligns with your vision. Look for royalty-free music or consider collaborating with a composer to create a unique soundtrack. Selecting appropriate background music will elevate the impact of your animation.
Recording voiceover or dialogue
If your animation includes dialogue or narration, consider recording voiceovers to bring your characters to life. Hire voice actors or record the voices yourself. Ensure that the voices match the personalities of your characters and that they are recorded with good audio quality. Recording voiceover or dialogue will add depth and personality to your animation.
Adding sound effects
Sound effects play a vital role in creating a realistic and immersive animation. Look for suitable sound effects to enhance actions, movements, and environmental elements. Consider sounds like footsteps, doors opening, or the rustling of leaves. Incorporating sound effects will make your animation more engaging and bring it closer to reality.
Editing and synchronizing audio
Edit and synchronize the audio elements to match the visuals in your animation. Ensure that dialogue and sound effects align with the actions on screen. Adjust the volume levels and add fades or transitions to create a seamless audio experience. Editing and synchronizing audio will enhance the overall quality of your animation.
Step 10: Finalizing and Exporting
Reviewing and making necessary adjustments
Take the time to thoroughly review your animation and make any necessary adjustments. Pay attention to the flow, timing, and consistency of the animation. Solicit feedback from others to gain different perspectives and identify areas for improvement. Reviewing and making necessary adjustments will ensure a polished and cohesive final product.
Polishing the animation
Polish your animation by refining the details and adding final touches. Pay attention to any imperfections, smooth out transitions, and ensure that each scene is visually appealing. Fine-tune the timing, spacing, and movement of the animation to create a professional-looking result. Polishing the animation will elevate its quality and make it stand out.
Checking for consistency and errors
Perform a final check to ensure consistency and eliminate any errors in your animation. Look for any inconsistencies in the visual style, character movements, or audio synchronization. Check for spelling errors in text elements and ensure that all assets are properly linked. Checking for consistency and errors will result in a seamless and polished animation.
Exporting the animation in the desired format
Choose the appropriate file format for exporting your animation, depending on its intended use. Common formats include MP4, MOV, or GIF. Consider the platforms or devices on which your animation will be viewed and select the format accordingly. Exporting the animation in the desired format will make it easily accessible and ready for distribution or sharing.
Creating your own animation requires careful planning, resource collection, and dedication to detail. By following these steps and utilizing the tools and techniques available, you can bring your animation concept to life. Take your time, enjoy the creative process, and strive for a final product that captivates your audience and showcases your storytelling skills. Happy animating!
