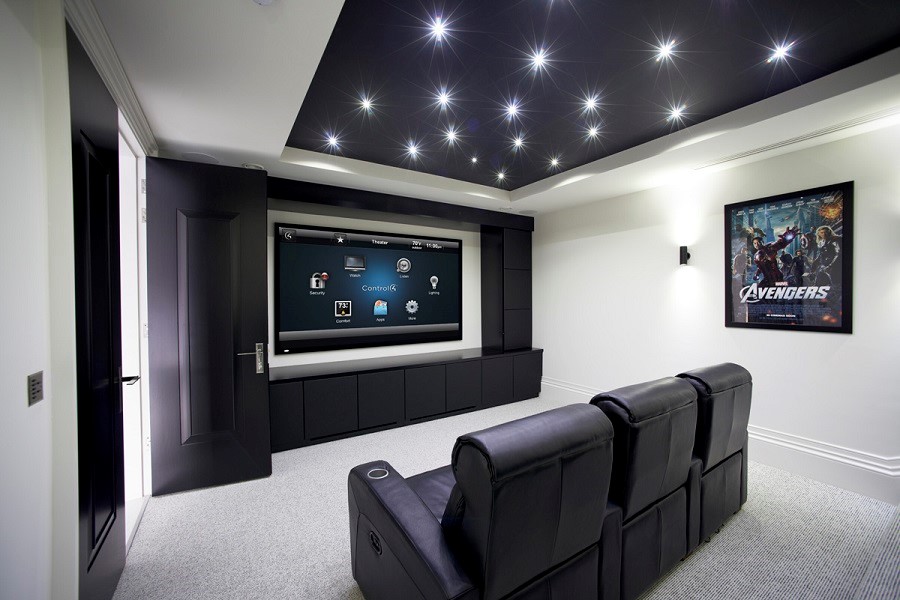
So, I’ve been thinking about upgrading my home entertainment setup and decided to dive into the world of home theater systems. I mean, who doesn’t want that immersive movie-watching experience right in the comfort of their own home, right? But let me tell you, it can be a bit overwhelming at first. There are so many things to consider, from choosing the right equipment to setting it all up properly. But don’t worry, I’ve got you covered. In this article, we’re going to talk about the step-by-step guide to installing a home theater system, so you can bring the cinematic magic into your living room without breaking a sweat.
First things first, let’s talk about the setup and configuration process. This is where you’ll want to pay close attention because it can make or break your home theater experience. The first step is to find the perfect spot for your system. Ideally, you’ll want a room with minimal natural light and good acoustics. Once you’ve found your spot, it’s time to start connecting the dots. You’ll need to connect your TV or projector to the receiver using HDMI cables and make sure all the speakers are properly connected as well. Trust me, this may seem like a daunting task, but with a little patience and the help of a trusty manual, you’ll be good to go. In the next part of this guide, we’ll dive into the nitty-gritty details of calibrating your system and fine-tuning the settings to get that immersive audio and video experience you’ve been dreaming of. So stay tuned, my friend, and get ready to turn your humble living room into a home theater paradise.
Step-by-Step Guide: Installing a Home Theater System
Installing a home theater system can be an exhilarating project that brings the perfect cinematic experience right into your own living room. Whether you’re a movie enthusiast or a gaming aficionado, a well-installed and configured home theater system can elevate your entertainment to a whole new level. In this step-by-step guide, I will walk you through the process of setting up and configuring your own home theater system, ensuring that you enjoy the benefits of a truly immersive audio and visual experience.
Step 1: Choose the perfect location for your home theater system
The first and most important step in installing a home theater system is to select the ideal location in your home. Consider these factors when choosing the perfect spot:
Measure the available space in your room
Start by measuring the dimensions of your room. This will help you determine the appropriate screen size and speaker placement. Take note of any structural elements like windows, doors, or columns that may affect the layout of your home theater system.
Consider the acoustics of the room
Acoustics play a vital role in creating an immersive audio experience. Assess the room’s sound characteristics, such as the presence of hard surfaces that may cause sound reflections and echo. Consider using acoustic treatments like wall panels or rugs to improve the room’s sound quality.
Evaluate the placement options for your equipment
Carefully evaluate the placement options for your audio and video equipment. Ensure that there is enough space for your speakers, AV receiver, subwoofer, and any other components you plan to include. Think about accessibility and cable management when determining the optimal location for each piece of equipment.
Step 2: Prepare the room for installation
Before installing your home theater system, there are a few essential preparations to be made:
Clear the area of any obstructions
Clear the room of any furniture, decor, or other obstructions that may hinder the installation process. Create a clean and spacious environment that allows for easy access to all components and promotes optimal sound and picture quality.
Make necessary electrical and cable connections
Ensure that you have access to sufficient electrical outlets to power your equipment. It is essential to have surge protection for your valuable electronics. Plan the cable routing to connect each component properly, keeping in mind cable lengths and potential signal degradation.
Ensure proper ventilation for your equipment
Home theater components such as AV receivers and amplifiers generate heat during operation. Make sure you locate your equipment in an adequately ventilated area to prevent overheating. Avoid confined spaces or closed cabinets that restrict airflow, as this can lead to performance issues and potential damage to your equipment.

Step 3: Install the audio components
The audio system is a crucial element of any home theater setup. Follow these steps to ensure optimal audio performance:
Mount the speakers at the optimal positions
Proper speaker placement is essential for creating a realistic and immersive audio experience. Refer to the manufacturer’s guidelines for the best positioning of your speakers. Generally, the front left, center, and front right speakers should form an arc facing the listener, while the surround speakers should be placed on the sides or behind the seating area.
Connect the speakers to the AV receiver
Once your speakers are properly positioned, connect each speaker to the corresponding terminals on the AV receiver. Ensure that you follow the correct polarity for each channel (positive to positive and negative to negative) to ensure accurate sound reproduction.
Calibrate the audio settings for optimal sound quality
Most AV receivers come with an automatic setup and calibration feature, which can optimize the audio settings based on your room’s specific characteristics. Use a calibration microphone (usually included with the receiver) to measure the speaker distances, levels, and speaker crossovers. This calibration process will result in a well-balanced and accurate soundstage.
Step 4: Install the video components
The visual components of your home theater system are just as important as the audio. Follow these steps to ensure a stunning visual experience:
Mount the TV or projector screen
Mount your TV or projector screen in the optimal viewing position. Consider factors like viewing distance, angle, and height to achieve the best picture quality. Ensure that the screen is securely mounted and leveled to avoid any issues during use.
Connect the video sources to the AV receiver
Connect your DVD or Blu-ray player, game console, and other video sources to the AV receiver using HDMI cables. HDMI is the preferred connection method for high-definition audio and video transmission. Be sure to use high-quality cables for stable and reliable transmission.
Set up the video settings for the best picture quality
Configure the video settings on your TV or projector to achieve optimal picture quality. Use the appropriate picture mode (such as Movie or Cinema) for accurate colors and adjust settings like brightness, contrast, and color temperature to suit your preference. Be sure to consult your equipment’s user manual for specific instructions.
Step 5: Connect and configure additional devices
In addition to your audio and video components, there may be other devices you want to connect to your home theater system. Follow these steps to ensure seamless integration:
Connect and configure your streaming devices
If you plan to stream content from services like Netflix or Hulu, connect your streaming device (such as a smart TV, streaming player, or media hub) to the internet and log in to your accounts. Set up any necessary preferences or parental controls for a personalized streaming experience.
Set up gaming consoles or Blu-ray players
If you’re a gaming enthusiast or enjoy watching Blu-ray movies, connect your gaming consoles or Blu-ray players to your home theater system. Use HDMI connections for the best audio and visual quality and configure any necessary settings for gaming modes or disc playback.
Ensure proper connectivity for external audio devices
If you have other audio devices like a turntable or cassette deck, consider connecting them to your home theater system for a more versatile setup. Use appropriate audio inputs on your AV receiver and configure the settings to accommodate different audio sources.
Step 6: Organize and manage cables
With a multitude of cables involved in a home theater system, organizing and managing them is crucial for both aesthetics and functionality. Follow these steps to keep your cables tidy:
Label and bundle your cables
To ensure easy identification and accessibility, label each cable with its corresponding component or connection. Bundle cables together using cable ties or Velcro straps to avoid tangling and make future maintenance or upgrades more manageable.
Use cable management solutions for a neat appearance
Invest in cable management solutions such as cable channels, raceways, or wire covers to conceal and protect your cables. These solutions help maintain a clean and clutter-free appearance while minimizing tripping hazards.
Ensure cables are safely hidden or protected
Consider hiding cables within walls, under carpets, or using cable management conduits to create a seamless and visually appealing setup. Take necessary precautions to protect cables from physical damage or accidental disconnection.

Step 7: Set up your universal remote control
Managing multiple remotes can be cumbersome. A universal remote control allows you to simplify and streamline the operation of your home theater system. Follow these steps to set up your universal remote:
Program the universal remote for your devices
Consult the user manual or manufacturer’s instructions to program your universal remote to control each component of your home theater system. Ensure that the remote is compatible with all your devices and follow the step-by-step instructions for programming.
Test and troubleshoot any connectivity or functionality issues
After programming your universal remote, thoroughly test its functionality. Ensure that all buttons are working correctly and that the remote can successfully control all connected devices. Troubleshoot any connectivity or functionality issues and refer to the remote’s user manual for troubleshooting guidance.
Personalize the remote for ease of use
Customize your universal remote by organizing buttons, assigning specific functions, or creating macros for frequently performed actions. This personalization will enhance usability and streamline your home theater experience.
Step 8: Configure your home theater receiver
The AV receiver acts as the central hub of your home theater system, managing audio and video signals. Follow these steps to configure your AV receiver for optimal performance:
Set up and adjust audio and video settings
Access the menu system of your AV receiver and navigate to the audio and video settings. Adjust audio settings like speaker size, crossover frequency, and audio processing modes to suit your preferences. Configure video settings such as video upscaling, display resolution, and color space for the best audiovisual experience.
Optimize speaker levels and channel configurations
Use the AV receiver’s built-in speaker calibration functionality to automatically optimize speaker levels and channel configurations. This calibration process takes into account the room’s acoustics and speaker distances to ensure proper audio reproduction and soundstage imaging.
Explore advanced features and customization options
Take time to familiarize yourself with the advanced features and customization options offered by your AV receiver. These may include equalization controls, network streaming capabilities, multi-zone audio distribution, or compatibility with digital assistants like Alexa or Google Assistant. Experiment with these features to further tailor your home theater experience.

Step 9: Fine-tune the audio and video performance
Fine-tuning is an essential step in achieving the best audio and video performance from your home theater system. Follow these steps to refine your system’s output:
Use audio calibration software or manual adjustments
If you have a discerning ear and want to fine-tune the audio settings manually, you can use audio calibration software or manual adjustment options provided by your AV receiver. Experiment with different settings, including equalizer adjustments, to achieve the desired audio balance and tonal characteristics.
Adjust video settings for brightness, contrast, and color accuracy
Calibrating the video settings will ensure accurate color reproduction, improved contrast, and optimized picture quality. Consider using a calibration disc or professional calibration tools to help set the brightness, contrast, color temperature, and other video parameters.
Experiment with different audio modes and enhancements
Most AV receivers offer various audio modes and enhancements designed to simulate different listening environments or enhance specific genres of content. Experiment with these modes to find the ones that best suit your preferences and the type of media you’re enjoying, whether it’s movies, music, or games.
Step 10: Install seating and accessories
To create a comfortable and immersive home theater experience, consider these additions:
Select comfortable seating options
Invest in appropriate seating options that provide both comfort and ergonomics. Consider dedicated home theater seats or a sectional sofa that allows for optimal viewing angles and accommodates multiple viewers. Ensure that seating is positioned at the appropriate distance from the screen for the best visual experience.
Enhance the viewing experience with appropriate lighting
Create a lighting setup that complements your home theater system. Install dimmable sconces or recessed lighting around the room to create a theater-like ambiance. Consider using blackout curtains or shades to eliminate any light pollution that may affect image quality.
Add additional accessories like soundproofing, curtains, or shelving
To further enhance your home theater experience, consider additional accessories. Soundproofing measures can reduce outside noise interference and improve audio clarity. Curtains or motorized blinds can help control light levels and prevent ambient glare. Shelving or media racks can provide convenient storage for your movie collection or gaming consoles.

Step 11: Set up a home theater network
Connecting your home theater system to your home network opens up a world of streaming and online content possibilities. Follow these steps to set up your home theater network:
Connect your system to your home network
Connect your AV receiver and any streaming devices or smart TVs to your home’s Wi-Fi or wired network. Follow the manufacturer’s instructions to establish a stable and secure connection.
Configure network settings for streaming and online content
Configure the network settings on your devices to enable streaming and online content access. Set up preferences such as network security, device naming, and internet connection speed to ensure a smooth and uninterrupted streaming experience.
Consider implementing wireless or smart home integration
Take advantage of wireless technologies like Bluetooth, AirPlay, or Chromecast for seamless audio and video streaming from compatible devices. If you have a smart home system, explore integration options to control your home theater system using voice commands or a centralized app.
Step 12: Test and troubleshoot your home theater system
Before enjoying all the benefits of your newly installed home theater system, it’s essential to test and troubleshoot any issues that may arise:
Verify audio and video playback functionality
Ensure that all audio and video components are functioning correctly. Test each input and source to verify audio and video playback functionality. Check for any distorted audio, artifacting, or visual anomalies that may need adjustment.
Resolve any connectivity or performance issues
Troubleshoot any connectivity or performance issues you may encounter. Double-check cable connections, network settings, and software updates. Consult the user manuals or online forums for specific troubleshooting steps related to your components and configuration.
Consult manufacturer manuals or seek professional help if needed
If you encounter persistent issues or require further assistance, refer to the manufacturer’s manuals or contact customer support. In more complex cases, consider consulting a professional installer or technician who specializes in home theater systems to ensure optimal performance.
Step 13: Customize and optimize your home theater experience
Now that your home theater system is fully installed and configured, it’s time to personalize your setup and make the most of it:
Experiment with audio presets and surround sound modes
Explore different audio presets and sound modes provided by your AV receiver. These presets can be tailored to specific content genres or listening preferences. Experiment with surround sound modes like Dolby Atmos or DTS:X to immerse yourself in a three-dimensional audio experience.
Adjust video settings based on personal preferences
Fine-tune the video settings to match your personal preferences and the specific content you’re enjoying. Adjust settings such as brightness, contrast, sharpness, and color saturation to achieve the desired visual experience. Remember to calibrate your display periodically for accurate and consistent performance.
Create user profiles and settings for individual family members
If your home theater system supports user profiles or individual settings, create separate profiles for each family member. This allows each person to have personalized audio and video preferences and simplifies the process of switching between different configurations.
Conclusion
Congratulations on successfully installing and configuring your own home theater system! By following this step-by-step guide, you have transformed your living room into a cinematic oasis. Now, sit back, relax, and enjoy the immersive experience of your well-installed and finely-tuned home theater system. Share your newfound knowledge and expertise with others to help them create their own home theaters and enjoy the benefits of an exceptional audio and visual experience.