So, you’ve always been curious about how to make homemade soap, huh? Well, you’re in luck because I’ve got all the answers for you. In this article, I’m going to give you a step-by-step guide to making your very own soap right at home. Trust me, it’s easier than you might think!
If you’re ready to dive into the world of soap-making, then stay tuned because you’re about to learn all the ins and outs. From gathering the necessary ingredients to mixing and pouring, I’ll walk you through each and every step. By the time you finish reading this article, you’ll have all the knowledge you need to start creating your own unique and luxurious homemade soaps. So, what are you waiting for? Let’s get started!
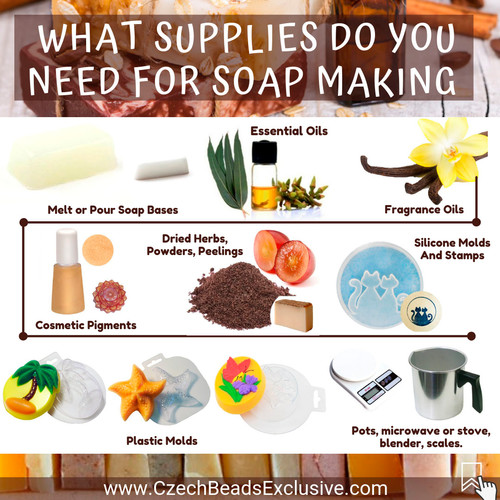
Step 1: Gather the Necessary Ingredients
Before you begin making homemade soap, it’s essential to gather all the necessary ingredients. Here’s a list of items you’ll need:
Subheading 1: Choose Your Oils and Fats
In order to make soap, you’ll need oils and fats as a base. There are various options to choose from, including olive oil, coconut oil, shea butter, and cocoa butter. Research different oils and their properties to determine which combination will work best for your soap recipe.
Subheading 2: Get Essential Oils for Aroma
To add fragrance to your homemade soap, you’ll need essential oils. These oils come from plants and offer a wide range of scents. Lavender, peppermint, and eucalyptus are popular choices. Consider your personal preferences and the intended use of the soap when selecting essential oils.
Subheading 3: Purchase Sodium Hydroxide
Sodium hydroxide, also known as lye, is a crucial ingredient in soapmaking. It is needed to create a chemical reaction with the oils and fats, turning them into soap. Ensure you purchase food-grade sodium hydroxide, as it is safe for use in soapmaking.
Subheading 4: Prepare Other Ingredients
Apart from the base oils, fats, essential oils, and sodium hydroxide, there are a few other ingredients you may want to consider. These include color additives such as natural clays or herbs, and additional moisturizing agents like honey or oatmeal. Determine your desired soap recipe and gather any additional ingredients accordingly.
Step 2: Prepare the Soap Mold
Now that you have all the necessary ingredients, it’s time to prepare the soap mold. Follow these steps:
Subheading 1: Select a Suitable Soap Mold
Choose a mold that is suitable for soapmaking. Silicone molds are popular choices as they are easy to use and release the soap easily. There are also wooden and plastic molds available. Consider the size and shape of the molds based on your desired final product.
Subheading 2: Line the Mold with Parchment Paper
To make it easier to remove the soap from the mold, line it with parchment paper. Cut the paper to fit the mold’s dimensions and press it firmly into place. This will prevent the soap from sticking to the mold and ensure a clean release.
Subheading 3: Set Up the Mold for Pouring
Place the lined soap mold on a flat, sturdy surface that won’t be disturbed. Ensure it is within easy reach of your work area, as you’ll be pouring the soap mixture into it later on.

Step 3: Measure and Mix the Ingredients
With the soap mold prepared, it’s time to measure and mix the ingredients. Follow these steps:
Subheading 1: Accurately Weigh the Oils and Fats
Using a kitchen scale, measure out the desired amounts of oils and fats according to your soap recipe. Be accurate in your measurements to ensure the soap turns out as intended.
Subheading 2: Measure the Sodium Hydroxide and Water
Next, measure the required amount of sodium hydroxide and water separately. It’s important to be precise with these measurements, as the correct ratio of sodium hydroxide to water is crucial for the soapmaking process.
Subheading 3: Combine the Sodium Hydroxide and Water
In a well-ventilated area or under a fume hood, carefully add the sodium hydroxide to the water. Be cautious as this mixture will produce heat and fumes. Stir the mixture with a heat-resistant spoon until the sodium hydroxide is completely dissolved. Set it aside to cool.
Subheading 4: Mix the Oils, Fats, and Lye Solution
In a separate heat-resistant container, combine the measured oils and fats. Heat the mixture gently until it reaches a temperature of around 100-110°F (38-43°C). Once both the oils and lye solution are at the desired temperature, slowly pour the lye solution into the oils while stirring continuously. Mix well until the mixture thickens and reaches a consistency known as “trace.”
Step 4: Add Scent and Color
Now that the base soap mixture is ready, it’s time to add scent and color to your homemade soap. Follow these steps:
Subheading 1: Choose and Measure Essential Oils
Select your desired essential oils for fragrance and carefully measure the required amount. When measuring essential oils, it’s important to be precise as they are potent and a little goes a long way.
Subheading 2: Select Natural Color Additives
If desired, choose natural color additives to enhance the appearance of your soap. Natural clays, herbs, or spices can be used to achieve the desired color. Measure out the required amount according to your recipe.
Subheading 3: Incorporate Scent and Color Into the Soap Mixture
Add the measured essential oils and color additives to the soap mixture. Stir well to evenly distribute the scent and color. Continue stirring until the mixture reaches a thick, pudding-like consistency.

Step 5: Pouring and Setting the Soap
With the soap mixture scented and colored, it’s time to pour it into the prepared mold. Follow these steps:
Subheading 1: Carefully Pour the Soap Mixture into the Mold
Slowly pour the soap mixture into the lined mold. Take care to pour it evenly while avoiding air bubbles. Use a spatula or spoon to level the surface of the soap if needed.
Subheading 2: Eliminate Air Bubbles
To eliminate any air bubbles that may have formed while pouring, gently tap the mold on a hard surface. This will help the soap settle and create a smoother finish.
Subheading 3: Allow the Soap to Set and Harden
Once poured, place the soap mold in a cool, undisturbed area where it can set and harden. Leave it for at least 24 hours or until the soap is firm to the touch. The curing time may vary depending on the recipe and ambient conditions.
Step 6: Cutting and Curing
After the soap has set and hardened, it’s time to cut it into desired shapes and allow it to cure. Follow these steps:
Subheading 1: Remove the Soap from the Mold
Carefully remove the soap from the mold by gently pulling on the parchment paper. If the soap doesn’t release easily, you can place the mold in the freezer for a short time to shrink it slightly, making the soap easier to remove.
Subheading 2: Cut the Soap into Desired Shapes
Using a sharp, clean knife, cut the soap into your desired shapes or bars. You can cut it into traditional rectangular bars or experiment with different shapes and sizes.
Subheading 3: Let the Soap Cure for Several Weeks
Place the cut soap bars on a drying rack or a tray lined with parchment paper. Allow them to cure for several weeks, turning them every few days to ensure even drying. This curing process will help the soap harden, mellow, and develop better lather.

Step 7: Packaging and Storing
Once your homemade soap has cured, it’s time to package and store it properly. Follow these steps:
Subheading 1: Wrap the Soap in Decorative Paper or Cloth
Wrap each individual soap bar in decorative paper or cloth to protect it and enhance its appearance. This can be done using wax paper, tissue paper, or fabric. Be sure to wrap the soap tightly to prevent moisture from getting in.
Subheading 2: Label the Soaps
Label each wrapped soap with the name of the scent and any additional information you’d like to include. This will help identify the soap and provide important details to the user.
Subheading 3: Store the Soap in a Cool, Dry Place
Store your wrapped and labeled soap in a cool, dry place away from direct sunlight. This will help maintain its fragrance, color, and quality. Avoid storing soap in humid areas, as moisture can cause it to soften and lose its durability.
Step 8: Enjoying Your Homemade Soap
Now that your homemade soap is complete, it’s time to enjoy the fruits of your labor. Here are a few ways to make the most of your homemade soap:
Subheading 1: Use Your Soap in Daily Bath and Skincare Routines
Incorporate your homemade soap into your daily bath and skincare routines. Enjoy the luxurious lather and aromatic scents as you cleanse and nourish your skin.
Subheading 2: Gift Your Homemade Soap to Friends and Family
Share the joy of homemade soap by gifting it to friends and family. Wrap up a few bars in a decorative box or bundle and give them as thoughtful and personalized gifts.
Subheading 3: Experiment with Different Ingredients and Techniques
Now that you have mastered the basics of soapmaking, don’t be afraid to experiment with different ingredients and techniques. You can create unique soap recipes by incorporating various oils, fats, scents, and colors. Let your creativity soar and enjoy the process of creating customized soaps.

Conclusion
Making homemade soap is a rewarding and satisfying craft. By following this step-by-step guide, you can create high-quality soaps tailored to your preferences and needs. The process of gathering ingredients, preparing the soap mold, measuring and mixing the ingredients, adding scent and color, pouring and setting the soap, cutting and curing, and finally packaging and storing the soap allows for a truly customizable and enjoyable experience. So go ahead, dive into the world of soapmaking, and unleash your creativity. Enjoy the numerous benefits of homemade soap and share your creations with friends and family. Happy soapmaking!