Have you ever experienced the frustration of a running toilet? You know, that annoying sound of water constantly running and wasting gallons of water? It can be quite a headache to deal with, but fear not, because I’m here to help you troubleshoot and fix your running toilet. In this article, you’ll learn some useful tips and tricks that will save you time and money. So, let’s dive in and get your toilet back in working order!
One of the most common reasons for a running toilet is a faulty flapper. The flapper is that rubber valve at the bottom of the tank that allows water to flow from the tank into the bowl when you flush. If it’s not properly sealing, water will continuously leak into the bowl and the tank will keep refilling. To fix this, you can try adjusting the chain length connected to the flapper or replace the flapper altogether if it’s worn out.
Another culprit behind a running toilet could be a high water level in the tank. If the water level is too high, it can cause a constant overflow from the overflow pipe, leading to a running toilet. To fix this, you can adjust the float mechanism or the fill valve to lower the water level in the tank. Sometimes, simply adjusting the float arm or the screw on the fill valve can do the trick.
Sometimes, mineral deposits can also cause a running toilet. If the fill valve or the flush valve is clogged with mineral build-ups, it can hinder their proper functioning and result in a continuous flow of water. In such cases, you can try cleaning these components by soaking them in vinegar overnight or replacing them if necessary. Remember to turn off the water supply to the toilet before attempting any repairs.
These troubleshooting tips should help you fix most common issues causing a running toilet. However, if you’re still facing problems or unsure about how to proceed, it’s always a good idea to contact a professional plumber. Now that you have some knowledge under your belt, you can tackle this DIY project with confidence. Good luck and happy toilet fixing!

Common Causes of a Running Toilet
A running toilet can be a frustrating and wasteful problem to deal with. Not only does it waste water, but it can also lead to higher water bills and potential damage to your bathroom. Understanding the common causes of a running toilet is the first step in troubleshooting and fixing the issue.
Leaking Flapper
One common cause of a running toilet is a leaking flapper. The flapper is a rubber or plastic valve that controls the flow of water from the tank to the bowl when you flush. Over time, the flapper can become worn or corroded, leading to leaks. This results in water constantly running into the bowl and causing the toilet to run.
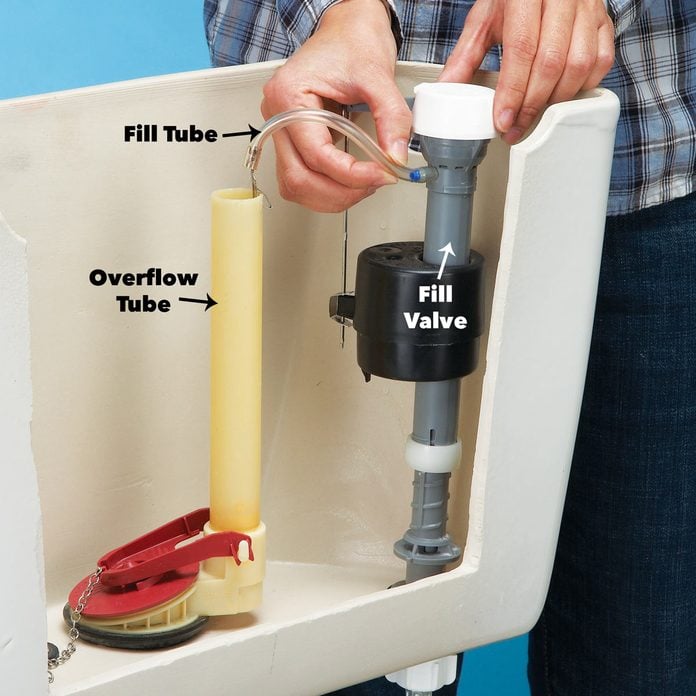
Faulty Fill Valve
Another potential culprit for a running toilet is a faulty fill valve. The fill valve is responsible for refilling the tank with water after each flush. If the fill valve malfunctions, it may not shut off properly, causing a continuous flow of water into the tank. This constant flow of water can result in a running toilet.
Corroded Flapper Chain
The flapper chain connects the flush handle to the flapper valve, allowing you to flush the toilet. Over time, the chain can become corroded, causing it to lose its effectiveness. A corroded flapper chain may not allow the flapper to close properly, resulting in a running toilet.
Improper Flapper Adjustment
Sometimes, a running toilet can be caused by improper flapper adjustment. If the flapper is not adjusted properly, it may not create a proper seal when the tank is refilling. This can lead to water continuously leaking into the bowl, causing the toilet to run.
Signs and Symptoms of a Running Toilet
Identifying the signs and symptoms of a running toilet is crucial in troubleshooting the issue. By recognizing these signs, you can determine the underlying cause and take steps to fix the problem.
Continuous Water Flow
One obvious sign of a running toilet is a continuous flow of water into the bowl. If you hear water running even when the toilet has not been flushed, it indicates that there is a problem with the toilet and it is running.
Audible Hissing or Running Water
In addition to continuous water flow, you may also hear audible hissing or running water sounds coming from the toilet. This noise is typically caused by a leak in the flapper or fill valve, leading to a running toilet.
Frequent Water Refills
If you find yourself having to refill the toilet tank frequently, it is a sign that your toilet is running. As water continues to leak from the tank into the bowl, the fill valve compensates by refilling the tank more frequently than usual.
Higher Water Bills
One of the most noticeable signs of a running toilet is a sudden increase in your water bills. A toilet that runs continuously wastes a significant amount of water, resulting in higher bills. If you notice a spike in your water usage without any other explanation, it is likely that your toilet is running.
Tools and Supplies Needed for Troubleshooting
Before you begin troubleshooting and fixing a running toilet, it’s important to gather the necessary tools and supplies. Having these items on hand will make the troubleshooting process much smoother.
Adjustable Wrench
An adjustable wrench is a versatile tool that can be used to tighten or loosen various toilet components. It is essential for disassembling and reassembling parts of the toilet during troubleshooting.
Plunger
A plunger is a must-have tool for every household. It can be used to unclog toilets and also help create a proper seal when testing the toilet for leaks.
Bucket
Having a bucket on hand is useful for catching any water that may spill during the troubleshooting process. It can also be used to drain the toilet tank for repairs.
Flapper Replacement Kit
A flapper replacement kit contains all the necessary components to replace a faulty flapper. It typically includes a new flapper valve, chain, and other small parts that may need replacement.
Step-by-Step Troubleshooting Process
Now that you have your tools and supplies ready, it’s time to start troubleshooting and fixing your running toilet. Follow these step-by-step instructions to identify and address the underlying issue.
1. Checking the Flapper
Start by inspecting the flapper for any signs of damage or wear. Remove the tank lid and locate the flapper at the bottom of the tank. Check for cracks, warping, or debris that may prevent the flapper from creating a proper seal.
2. Inspecting the Fill Valve
Once you have examined the flapper, move on to inspecting the fill valve. This is usually located on the left side of the tank. Remove the tank lid and look for any signs of leaks or malfunctioning mechanisms. Check all the connections and make sure everything is tight and secure.
3. Examining the Flapper Chain
Next, examine the flapper chain to ensure it is not corroded or tangled. A corroded chain may prevent the flapper from closing properly, resulting in a running toilet. If the chain is tangled, untangle it to ensure proper operation.
4. Adjusting the Flapper or Water Level
If you have determined that the flapper is not sealing properly or the water level is too high, it may be necessary to make adjustments. Follow the manufacturer’s instructions to adjust the flapper or water level to the proper settings. Test the toilet to see if the adjustments have resolved the running issue.
Fixing a Leaking Flapper
If you have identified a leaking flapper as the cause of your running toilet, follow these steps to fix the issue.
1. Shutting Off the Water Supply
Before you begin any repairs, shut off the water supply. Locate the shut-off valve behind the toilet and turn it clockwise until the water is completely shut off.
2. Removing the Old Flapper
Once the water is turned off, remove the tank lid and locate the flapper at the bottom of the tank. Disconnect the flapper chain from the flush handle and carefully remove the old flapper from the overflow tube.
3. Installing the New Flapper
Take the new flapper from the replacement kit and attach it to the overflow tube. Make sure it fits securely and creates a proper seal. Reattach the flapper chain to the flush handle.
4. Testing for Leaks
Turn the water supply back on and observe the flapper for any signs of leaks. Flush the toilet and check if the flapper closes properly and stops water from entering the bowl. If there are no leaks and the flapper operates correctly, you have successfully fixed the running toilet.
Repairing a Faulty Fill Valve
If a faulty fill valve is the culprit behind your running toilet, follow these steps to repair it.
1. Shutting Off the Water and Draining the Tank
Start by shutting off the water supply to the toilet and draining the tank. Follow the same steps mentioned earlier to shut off the water supply and remove the tank lid. Flush the toilet to drain the tank completely.
2. Removing the Faulty Fill Valve
Locate the fill valve, typically on the left side of the tank, and disconnect it from the water supply line. Use an adjustable wrench to loosen and remove any connections. Carefully remove the faulty fill valve from the tank.
3. Installing a New Fill Valve
Take the new fill valve and follow the manufacturer’s instructions for installation. Secure the valve in place and tighten all connections to ensure a proper fit. Reattach the water supply line to the fill valve.
4. Testing the New Valve
Turn the water supply back on and allow the tank to fill. Observe the fill valve for any signs of leaks. Adjust the float level if necessary to ensure proper water filling. Flush the toilet and check if the fill valve shuts off properly after each flush. If there are no leaks and the fill valve functions correctly, you have successfully repaired the running toilet.

Resolving a Corroded Flapper Chain
If a corroded flapper chain is causing your running toilet, follow these steps to resolve the issue.
1. Detaching the Corroded Chain
Start by shutting off the water supply and draining the tank. Remove the tank lid and locate the corroded flapper chain. Detach the corroded chain from the flush handle and the flapper valve.
2. Replacing the Flapper Chain
Take a new flapper chain from a replacement kit or purchase one separately. Attach one end of the chain to the flush handle and the other end to the flapper valve. Ensure the chain has enough slack to allow the flapper to fully close and create a proper seal.
3. Checking for Proper Adjustment
Verify that the flapper chain is properly adjusted. It should have enough slack to allow the flapper to fully close without being too loose. Adjust the chain length as necessary to ensure proper operation.
4. Testing the Toilet
Turn the water supply back on and allow the tank to fill. Flush the toilet and observe the flapper chain and valve for any signs of leaks or malfunctions. If the flapper closes properly and there are no leaks, you have successfully resolved the running toilet issue.
Adjusting the Flapper or Water Level
If a simple adjustment is all that’s needed to fix your running toilet, follow these steps.
1. Adjusting the Flapper for a Better Seal
If the flapper does not create a proper seal, adjust it for a better seal. There are different ways to adjust the flapper depending on the type of toilet. Consult the manufacturer’s instructions or online tutorials for guidance on adjusting the specific type of flapper.
2. Adjusting the Water Level in the Tank
If the water level in the tank is too high, it can cause the toilet to run. Adjusting the water level is usually done through the fill valve. Again, consult the manufacturer’s instructions or online resources for guidance on adjusting the water level for your specific toilet model.
3. Testing the Flapper and Water Level
Turn the water supply back on and allow the tank to fill. Flush the toilet and observe if the flapper closes properly and if the water level in the tank is at the correct height. Make any necessary adjustments to ensure both the flapper and water level are functioning correctly.

Additional Tips for Fixing a Running Toilet
Here are some additional tips to keep in mind when troubleshooting and fixing a running toilet.
Using Plumbers Tape for Sealing
When reinstalling components or making adjustments, it’s a good idea to use plumber’s tape to ensure a proper seal. Apply a few wraps of plumber’s tape to the threads of connections to prevent leaks.
Cleaning Mineral Deposits from the Flapper
If your flapper is covered in mineral deposits, it may not create a proper seal. Clean the flapper by soaking it in a mixture of vinegar and water. Scrub the flapper gently with a soft brush to remove any deposits.
Checking and Replacing the Float Assembly
The float assembly is responsible for regulating the water level in the tank. If this assembly is malfunctioning, it can cause a running toilet. Check the float assembly and replace it if necessary.
Calling a Professional Plumber if Necessary
If you’re unable to identify or fix the issue causing your toilet to run, don’t hesitate to call a professional plumber. They have the expertise and tools necessary to diagnose and repair complex toilet problems.
Prevention and Maintenance for Future Issues
To prevent future running toilet issues, it’s important to perform regular maintenance and take preventative measures.
Regularly Inspecting Toilet Components
Make it a habit to inspect your toilet’s components regularly. Check the flapper, fill valve, and flapper chain for signs of wear or damage. Replace any faulty or worn-out parts promptly to prevent running toilet issues.
Cleaning the Toilet Regularly
Regularly cleaning your toilet not only keeps it looking fresh but also helps prevent clogs and other plumbing issues. Use a toilet cleaner and brush to remove any mineral deposits or buildup that may affect the toilet’s functionality.
Avoiding Flushing Non-Biodegradable Items
Toilets are designed to handle human waste and toilet paper. Avoid flushing non-biodegradable items such as paper towels, sanitary products, or baby wipes. These items can easily clog the toilet and cause running issues.
Monitoring Water Bills for Unusual Increases
Pay attention to your water bills and monitor them for any unusual increases. A sudden spike in water usage may indicate a running toilet or another plumbing issue. Address the problem promptly to avoid wasting water and incurring high bills.

Conclusion
Fixing a running toilet can be a simple DIY task if you follow the troubleshooting tips outlined in this article. By identifying and addressing the common causes of a running toilet, you can save water, prevent damage, and maintain a properly functioning toilet. Remember to regularly inspect and maintain your toilet to avoid future running toilet issues.