So you’ve always wanted to try your hand at making pasta from scratch but don’t know where to start? Look no further! This step-by-step guide will walk you through the process of creating delicious homemade pasta that is sure to impress your family and friends. With simple instructions and a few key ingredients, you’ll be rolling out your own fresh pasta in no time. Get ready to elevate your cooking skills and discover the joy of homemade pasta!
Gathering the Ingredients
To make pasta from scratch, you will need a few essential ingredients: flour, eggs, salt, and water. These are the building blocks that will come together to create the perfect pasta dough. It’s important to gather all the ingredients before you begin, so you have everything you need within reach as you go through the steps.
Flour
The first ingredient you’ll need is flour. All-purpose flour is commonly used for making pasta, as it provides the right balance of gluten for a tender yet sturdy dough. Be sure to measure the flour accurately, as too much or too little can affect the texture of your pasta.
Eggs
Eggs hold the pasta dough together and add richness to its flavor. You’ll need fresh eggs for this recipe, as they play a crucial role in binding the ingredients and adding moisture. The number of eggs you’ll need will depend on the amount of pasta you want to make. As a general guideline, one egg is typically used for every 100 grams of flour.
Salt
Salt is a key ingredient in any pasta recipe as it enhances the taste. You’ll need to season your pasta dough with salt to bring out its flavors. Add salt sparingly, as you can always adjust the seasoning later when cooking the pasta.
Water
Water is the final ingredient that will bring all the other components together. You’ll need water to hydrate the dough and create the desired consistency. Make sure the water is at room temperature so that it can easily incorporate into the flour and eggs.
Preparation
Before you start making the pasta dough, it’s essential to prepare your workspace and the ingredients.
Clean and organize the workspace
Begin by ensuring your workspace is clean and tidy. Clear off any unnecessary clutter and wipe down the surface to create a clean and hygienic area to work in. Having an organized workspace will make the pasta-making process more efficient and enjoyable.
Measure and sift the flour
Measure the desired amount of flour you need for your pasta recipe and sift it into a large mixing bowl. Sifting the flour helps remove any lumps and aerates it, resulting in a smoother and more consistent dough.
Prepare the egg mixture
In a separate bowl, crack the eggs and whisk them together until they are well beaten. This is the base of your pasta dough and will provide the needed moisture and structure.
Boil the water
Fill a pot with water and bring it to a boil. You’ll need the boiled water later to cook the pasta. It’s always a good idea to have the water ready so that you can proceed without any delays.

Making the Dough
Now that you have all the ingredients prepared, it’s time to bring them together and create the pasta dough.
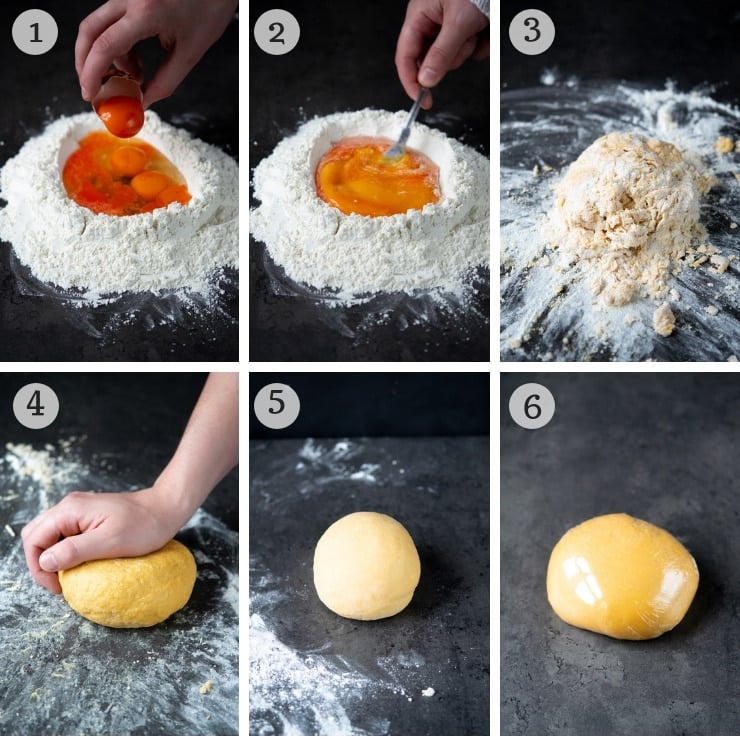
Create a well in the flour
Make a well or indentation in the center of the sifted flour. This well will serve as a space to pour in the eggs and eventually incorporate them into the flour.
Gradually add the egg mixture
Pour a small portion of the beaten eggs into the well of flour. Using your fingers, gradually incorporate the flour into the eggs. Continue adding the eggs in small increments, while simultaneously incorporating the flour. This method allows you to control the consistency of the dough and prevent clumping.
Mix with a fork
Once all the eggs have been added and the mixture begins to form a sticky dough, switch to using a fork. Use the fork to gently mix the dough, incorporating the remaining flour from the sides of the well. Be careful not to overmix; you want to achieve a smooth and elastic consistency.
Knead the dough
Transfer the dough onto a lightly floured surface and begin kneading. Kneading helps develop the gluten in the dough, giving it structure and elasticity. Fold the dough over itself and push down with the palm of your hand. Repeat this motion, turning the dough as you go, for about 10-15 minutes. The dough should become silky, smooth, and slightly elastic.
Resting the Dough
After kneading the dough, it’s crucial to let it rest before moving on to the next step. Resting the dough allows the gluten to relax and the flavors to meld together.
Wrap the dough in plastic wrap
Shape the dough into a ball and wrap it tightly in plastic wrap. This will prevent the dough from drying out and forming a crust while it rests. Ensure that the plastic wrap tightly seals the dough.
Let it rest at room temperature
Place the wrapped dough on your countertop or any flat surface and let it rest at room temperature. The ideal resting time is around 30 minutes to an hour. During this time, the gluten will relax, which will make the dough easier to roll out and shape later on.
Allow the dough to relax
As the dough rests, it will relax and become more pliable. This relaxation period helps ensure that the pasta dough will be easier to roll out and shape without springing back. It also allows the flavors to meld together, resulting in a more flavorful end product.

Rolling the Dough
After the dough has rested, it’s time to roll it out into thin sheets, ready to be transformed into your desired pasta shape.
Divide the dough into smaller portions
Unwrap the rested dough and divide it into smaller, more manageable portions. This step will prevent the dough from drying out while you work with one section at a time. Wrap the portions you’re not using with plastic wrap to keep them from drying out.
Flatten each portion with a rolling pin
Take one portion of the dough and flatten it slightly with your hands. Then, using a rolling pin, start rolling the dough outward from the center. Roll in one direction, applying even pressure, until the dough is thin and even. If the dough sticks, lightly dust it with flour.
Keep the surface and dough lightly floured
While rolling out the dough, it’s crucial to lightly dust both the rolling surface and the dough itself with flour. This prevents the dough from sticking and tearing, making it easier to work with.
Roll the dough to desired thickness
Continue rolling the dough until you reach your desired thickness. For some pasta shapes, like lasagna or ravioli, you may want a slightly thicker dough. For others, like fettuccine or spaghetti, a thinner dough is preferable. The choice of thickness is entirely up to you and your personal preference.
Cutting the Pasta
Once you’ve rolled out the dough, it’s time to transform it into your desired pasta shape. Whether you prefer fettuccine, spaghetti, or any other shape, the process remains the same.
Choose the desired shape
Decide on the shape of pasta you’d like to make. You can use a pasta machine or a rolling pin to shape the dough, depending on the tools you have available.
Use a pasta machine or rolling pin
If you have a pasta machine, feed the rolled-out dough through the machine’s cutters to create the desired shape. If you don’t have a pasta machine, you can also use a rolling pin to cut the dough. Place the rolled-out dough on a lightly floured surface and use a sharp knife or a pizza cutter to cut the dough into strips or shapes.
Cut into fettuccine, spaghetti, or other shapes
For fettuccine or spaghetti, cut the dough into long, thin strips. If you’re feeling adventurous, you can experiment with cutting the dough into different shapes, such as ravioli, tortellini, or farfalle. Be creative and have fun with it!
Dust with flour to prevent sticking
After cutting the pasta into your desired shape, dust it lightly with flour to prevent the pieces from sticking together. Gently toss the pasta to coat it evenly with flour and separate any pieces that might have stuck together.

Cooking the Pasta
With the pasta cut and ready to cook, it’s time to move on to the final step before enjoying your homemade creation.
Bring a pot of salted water to a boil
Fill a large pot with water and bring it to a rolling boil. Add salt to the water for flavoring, just as you would when cooking any pasta.
Add the pasta
Carefully drop the cut pasta into the boiling water. Be cautious, as the hot water might splash up. Stir the pasta gently to prevent sticking.
Cook for a few minutes until al dente
Cook the pasta for a few minutes until it reaches the desired consistency, usually referred to as “al dente.” Al dente means that the pasta is firm to the bite but still cooked through. Test a small piece of pasta for doneness as you approach the recommended cooking time.
Drain the pasta
Once the pasta is cooked to your liking, drain it in a colander or use a pasta strainer to remove the water. Rinse the pasta briefly with cold water to halt the cooking process and remove any excess starch.
Serving Options
Now that your pasta is cooked and ready to enjoy, it’s time to get creative with the various serving options.
Toss with your favorite sauce
One classic way to serve homemade pasta is to toss it with your favorite sauce. Whether it’s a simple olive oil and garlic combination or a rich tomato-based sauce, the possibilities are endless. Experiment with different sauce recipes and find your perfect pairing.
Add toppings and garnish
Elevate your pasta dish by adding delicious toppings and garnishes. Sprinkle grated cheese, such as Parmesan or Pecorino, over the pasta for added flavor. Fresh herbs like parsley, basil, or oregano can also be used as a finishing touch.
Serve alongside meats or vegetables
Pasta is incredibly versatile and pairs well with various meats and vegetables. Consider serving it alongside grilled chicken, sautéed shrimp, or roasted vegetables. The combinations are endless, and you can get as creative as you like.
Experiment with different flavors
Don’t be afraid to experiment with different flavors in your pasta dough. Add herbs, spices, or even vegetable purees to the dough to create unique and flavorful pasta. Try incorporating spinach, beet, or tomato pastes into the dough for vibrant and tasty variations.

Storage
If you have leftovers or want to make pasta ahead of time, proper storage is essential to preserve its quality.
Dry the pasta thoroughly
After cooking the pasta, ensure it is thoroughly dried before storing it. This can be done by spreading the pasta out on a baking sheet or hanging it on a drying rack. Let it air dry for about an hour or until completely dry to the touch.
Store in an airtight container
Once the pasta is dry, transfer it to an airtight container to prevent moisture from seeping in. Make sure the container is clean and dry before adding the pasta. Label the container with the date and type of pasta, if desired, for easy identification.
Keep in a cool, dry place
Store the container of pasta in a cool and dry place, such as a pantry or cupboard, away from direct sunlight or heat sources. Exposure to heat or humidity can cause the pasta to spoil or lose its quality.
Use within a few months
Homemade pasta is best when consumed within a few months of making it. While it will still be safe to eat beyond that timeframe, the quality and texture may deteriorate over time. It’s best to enjoy your homemade pasta while it’s still fresh.
Cleaning Up
After the satisfying process of making your own pasta, it’s time to clean up and put away the utensils and equipment.
Clean the workspace
Take a moment to wipe down your workspace and any surfaces that came into contact with the pasta dough. Use warm, soapy water and a clean cloth to remove any residue or flour.
Wash the utensils and equipment
Clean all the utensils and equipment used during the pasta-making process. Wash them thoroughly with warm, soapy water, paying extra attention to any dough or flour stuck on them. Rinse them well and dry them properly to prevent rust or mold.
Dry and store properly
Make sure all the utensils and equipment are completely dry before storing them. Water left on utensils can promote the growth of bacteria or cause corrosion. Store the items in a clean, dry place, ready for your next pasta-making adventure.
Enjoy your homemade pasta!
Now that the cleanup is done, it’s time to sit back, relax, and enjoy the fruits of your labor. Whether you choose to savor your homemade pasta with a classic marinara sauce or get creative with new flavors and toppings, there’s nothing quite as satisfying as enjoying a delicious plate of fresh, homemade pasta. Bon appétit!
